RILEY BLAKE BABY QUILT

It’s been so long since I posted something crafty on here – I can’t even remember the last craft post I did… how bad is that! Craft posts made up the majority of my content when I first started blogging… it’s crazy to think how different my blog is now.

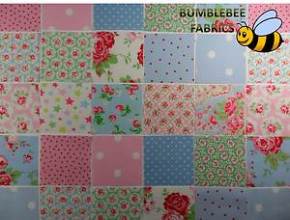
Anyway, I got some really cute Riley Blake fabric for Christmas and some family friends recently had a baby boy, so what better way to put my fabric to good use!
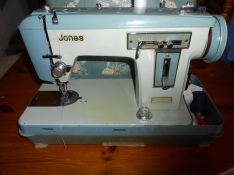
It’s been such a long time since I worked on a project like this so it took me a little while to get back into the swing of things. Oh, and the fact that my sewing machine broke made things a whole lot harder! For those of you that haven’t been here since my blogs birth – I used to use my Nan’s old Jones machine, and when I say old I mean about 45 years! I guess it did exceptionally well to last as long as it did.

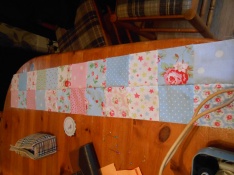
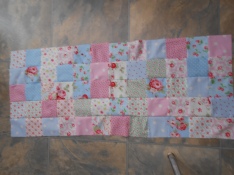
So below we have the finished product! I really wish that I could turn row two upside down so it was symmetrical but by the time I’d realised what I’d done it was too late, and there’s no way I was going to unpick it! I gave very little seam allowance and I didn’t want some of the blocks to fray and end up being too small. Still, I suppose it’s flaws prove that it’s a handmade quilt rather than yet another factory clone!

DSCN1652And how cute is that little H?! I think it adds a cute little personal touch – don’t you?

DSCN1654I’ll put my hand up and be the first to point out that the applique is a bit wonky and the stitching on the binding isn’t perfect, but like I said – flaws make things personal and unique.

DSCN1655DSCN1656I’m rather pleased with it! I wish I’d of used blue thread to attach the binding instead of white, but it’s not a major issue. I had to unpick the binding in a few places as I hadn’t caught the underneath, but it didn’t take long and it definitely improved the quality.

I’ve actually missed sewing and crafting more than I had realised! I can’t wait to get back into it again. And my new sewing machine (it’s a Singer) has so many different options to play around with – my Nan’s one just had one stitch setting! Exciting projects are on the way my friends!

MY EBAY WATCH LIST – OCTOBER

My last eBay wishlist has been so popular that I thought I’d do an updated one! I may even turn this into a monthly thing – like monthly favourites, but a watch/wish list instead! Check out last months here.

I really don’t know how I found this, but I’m glad that I’ve realised that such a thing exists. However, I’m also pretty bummed that I’ll never own it – looka the price of that!! Obviously that price is in US dollars, which converested to UK sterling is £77.79, which isn’t as bad… there’s still no way I could justify spending that amount of money on it though. And it would just sit it a display cabinet! I guess it’s only on my wishlist to remind myself that I’m not the only Disney fanatic.

omg Continue reading

A height chart and another quilt?!

Do you guys remember how long it took me to finish my first ever quilt? Way too long is the honest answer to that. If you have no clue what I’m talking about, check out this, this and this.

Looked? Good, now your up to date I’m sure you’re thinking something along the lines of “Okay, but what do you mean ANOTHER quilt? You can’t possibly have started and finished a quilt in the few days you’ve been gone! And made a height chart?!”

But oh yes dear friends, indeed I have!

Image

I defy anyone to comment and say that they haven’t fallen completely in love with that fabric. It’s the cutest, softest most adorablest (thatta word?) fabric that I have ever seen! I’ll give ya a close up:

Image

All together now: “AWWWH!”

In my last post I think I said that I was going to be making a height chart. I did? Good – here it is!

Image

I honestly didn’t think I was gonna be able to get on here to show you what I’d been doing over the last few days because this chart took forever and a day… but luckily the quilt only took 6 hours! I think the height chart took so long because I did all the embroidery by hand, and obviously I had to faff about stencilling the pattern on and I also made the binding. I had a bit of trouble with the top of the chart too as I was trying to insert a wooden dowel in the top so it didn’t sag when it was hanging on the wall. It all turned out okay in the end though.

And if you’re wondering what I’m going to do with all these creations – they’re going on my etsy! It’s still not open yet because I’m making things to actually stock it with, but when it’s open I’ll let you know!

BambiLeigh’s first quilt!

As I say in the video, it’s way easier to attempt to show you guys the finished quilt like this rather than taking photo’s!

BambiLeigh’s first bag making experience!

In this post here, that I was in the process of attempting to make my first bag – and since I’m afraid of my sewing machine, I did it all by hand… so I’m sure you can understand why it took my a couple days to finish.

Image
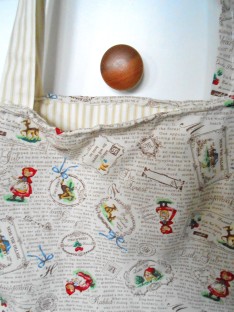
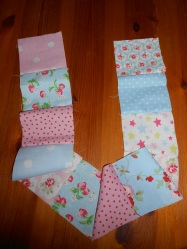
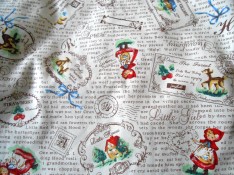
I was quite nervous about making this bag as I’m really bad at following tutorials, and I didn’t wanna mess up and ruin the fabric – it’s so cute! It’s also kinda funny, I don’t know why it’s like it is, but loads of the words have random letters in them and it’s a bit higgildy piccildy, but I think that’s kinda cute. If you click on the picture to enlarge it and look it the top right hand corner area, just above the larger word ‘strawberry’ that’s upside down, it says Little Bed Riding Bood! The fabric also looks quite white here, but it’s actually a creamy/beige/ivory colour – if that makes sense!

I’m the first to admit that I’m in no way a ‘sewing wizz’ (clearly, I’m afraid of a machine), I may even be a bit crap at crafts and the like, so I’m certain there are many many people out there that could have done a better job than me, but I kinda like it.

Image

I made a couple mistakes, but unless you really study all the stitching you can’t really tell. If you saw me walking down the street with this bag you wouldn’t be able to tell that there was anything out of place, or just generally sewn wrong.

I’ve only used it once so far and it hasn’t fallen apart, so I guess that’s good, right? Although I did put my camera in the inside pocket and the pocket started to fall off… but I’d only tacked it on, so I guess that’s my own fault. All is fixed now though!

Leave me a comment and let me know what you think! Also, if anyone’s got any handy bag making tips then please share!

Side note: Anyone remember that quilt I was making? Well I’ve finally sewn the front, batting and back together – and I used my machine! I’ve trimmed off the edges and the binding is going to be attached tomorrow. I’m so nearly finished!!

Car pocket

Image

So I made this cute little car pocket based on a ‘car trash bag’ that I saw here. I didn’t have enough fabric to make her version so I just made this small one to hang off the gear stick in my car to throw my phone and things in so they’re not rattling round!

My boyfriend ordered me some more fabric last night (aw) so as soon as that comes I’ll be making a full sized trash bag!

I’ve also finally finished my quilt top and I’ve sewn the batting and backing on! Pictures to follow soon!

Green floral camera case

Image

I got a new camera for my 20th birthday a couple of months back and I still hadn’t got a case for it. I didn’t want it to get scratched and ruined so I didn’t really use it that often.
My boyfriend got me some cute fabric off ebay and some wadding so I can finally finish my quilt (which I’m planning to do over the next few days), so I thought it was about time I finally made a camera case!

I’d never really made a case that had to be a specific size in order to put something in it, but it’s actually a lot easier to do than I thought it would be. My nifty little case has also got lining – I’ve never lined anything before!

Image

I’m still pretty new to the whole crafty fabric diy scene but I don’t think I’m doing too badly! I also went out and bought a cutting mat today so measuring out fabrics should be a lot easier to get right now – no more faffing about with a little ruler!

The case looks a lot better with the camera actually in it – but obviously I can’t take a picture of that!

Not gonna lie, I’m pretty proud of myself!

Image

I was planning to post a picture of the squares once I’d sewn them into their rows, but I got carried away and now I’ve ended up sewing five rows together! No one ever told me that it will give me chronic back ache though! Although I do sit very hunched over at the sewing machine, so that’s probably my own fault. And I’ve taken over the dining room table! It’s lucky we don’t use it much really – I don’t want tomato sauce stains on my fabric!

When the fabric first arrived I laid them all out on the living room floor into the pattern I wanted, then pinned each row together and labelled them 1, 2, 3 etc. and started to sew each square together. Then I ironed out the seams – I’ve seen two methods of doing this online; one woman ironed each seam in one row to the left, then the next row’s seams to the right, and another woman ironed each seam down the middle (so they were facing toward the fabric they came from) – and that’s the method I chose. That’s the point where I was planning to stop… clearly that didn’t happen. I ended up sewing two rows together, which is when I took the picture above, and THEN I was going to stop.

Image

That didn’t happen either. I’ve literally had to pry myself away from the machine to post this! So, I’ve now ended up sewing five rows together, but not in the line order that I first planned – I’ve jiggled things about a bit. The picture doesn’t do it justice, but I think it looks pretty good.

You know when you’re planning a project in your head, then you actually do it and it looks nothing like you thought it would? Well I can happily say that this isn’t one of those moments for me – and I’ve had plenty! (whatever you do, don’t look at my scrapbook)

I’m off to give my back a rest… no promises that I won’t jump straight back on the machine.

I’ve finished the first row of my quilt!

I thought I’d post a few pictures of my first row, just to keep myself occupied for a little while so I don’t spend all day slaving over the machine! And it really isn’t as difficult as I thought it was going to be! Although I did have a lot of advice from other bloggers – Janneke and Clipped Curves have been really helpful!

Image

I mentioned in this post that my sewing machine was super old and that I wasn’t really sure how to use it, but I went to my Nan’s today for lunch and took this with me (it used to be hers) and she jogged my memory!

Trying to lift this beast in and out of the car boot was not an easy task!

Image

Now the first row is finished, I can’t wait to do the second row – and I’m sew happy (haha) that I chose to do it by machine rather than by hand, I’d be there forever! And now I finally understand why everyone was going on about seams and pressing/ironing them, it really does make sense!

I’m off to do another row! 😀

New project!

Image

How cute is this fabric?! It should be here Tuesday/Wednesday and I’m super excited! (is that a bit sad?)

I’m planning to make my first ever quilt, and whilst I do have a sewing machine it’s super old and I’m not completely sure how to use it. I’m hoping it won’t be too difficult to do by hand, but I’ll admit I am slightly nervous about it. I don’t want it to go wrong!

Should I sew all the patches together, and then add the wadding and the backing fabric? Or should I do it all in one go? Do I add a border? What is quilt binding? How should I sew it? What stitch should I use? Do I sew each patch together with a hem on the inside? I’m so confused! I think I’m definitely going to have to do some major googling and see if theres a quilting 101 for dummies, or a quilting from start to finish kind of site that I can slave over before getting started… There’s a million questions I need answering!

If anyone has any advice or tips – please let me know! I’ll let you all know when the fabric arrives!